DIY Extra Large Pet Gate for Cats
After unsuccessfully trying to introduce my cats to my boyfriend’s cat, the need for an extra-tall, extra-long cat gate has arisen. We have a severe case of inter-cat aggression and have to keep our cats completely separated at all times.
We started with a simple 40” tall child gate. But my high-jumping Savannah Cats didn’t have any trouble getting over that. Plus we needed something much longer. We tried stringing construction fencing across our living room. But at 42” high it still wasn’t tall enough. And it definitely wasn’t sturdy enough to withstand attacks from our very motivated attack cat.
After meeting with our Cat Behaviorist it was determined that we needed a 4 foot-tall (48”) fence that spanned our 20-foot wide living room. The fence needed to be sturdy enough to withstand cats slamming into it. It needed to be open or transparent enough that you could see and smell through it.


I wanted it to be modular and collapsible so it could be easily taken down and stored in a closet, in the off chance we ever had company over. I also didn’t want it to look completely hideous. But aesthetics weren’t high on my list of priorities. We are talking about putting up a 20-foot long pet gate in the middle of our home so our cats can have a better living situation. Clearly, our priorities are out of sync by normal people’s standards.
So to recap, these were the design parameters for our customized indoor pet gate:
- Minimum 4 Feet in Height
- 20 Feet Wide
- Sturdy
- Visually transparent
- Open but not too open
- Modular
- Collapsible
- Not too ugly
- Under $200
The entire project ended up costing just over $150 and we are extremely pleased with the outcome. This cat gate does exactly what it was designed to do and it didn’t cost a fortune. It might be a bit overkill for a dog or child, but the same basic design can be scaled to accommodate your situation.
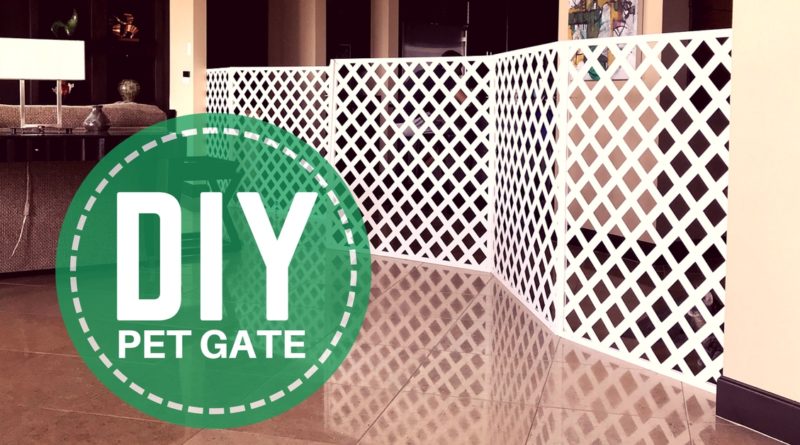
20’ x 4’ Collapsible Plastic Lattice Pet Gate

After several design iterations, we decided to go with a collapsible lattice fence. Home Depot and Lowes sell sheets of 4’ x 8’ white vinyl lattice for about $18 each. It is also available in other colors for about $28 each. The lattice by itself is not very sturdy. It definitely wouldn’t be sturdy enough to make a free-standing fence as I had designed.
That’s where the lattice caps come into play. The cap moulding provides enough support to make a 4’ x 4’ section of vinyl lattice rigid enough for our fence design. So in addition to the lattice, you’ll also need enough lattice cap moulding for the perimeter of your fence sections. An 8’ piece of cap moulding is approximately $7.50. And you’ll need 16’ per fence section, assuming you’re trying to build a 4’ x 4’ collapsible fence like ours.
Here’s what you’ll need:
- (3) 4’x8’ Vinyl Lattice
- (12) 8’ Vinyl Lattice Caps
- (42) #4 x ½” Screws
- (10) Plastic Zip Ties
- Tape Measure
- Circular Saw
- Drill
- Spring Clamps
- White-out (Optional)
- Velcro (Optional)
Here’s what to do:
Measure then Cut
After you’ve got all your materials, you’ll need to cut the lattice pieces and caps in half. Since we had limited room in our car we had the guys at Lowes cut them for us. In hindsight, we probably should have waited to cut them at home where we could get an exact measurement. The lattice isn’t exactly 8 feet in length, so we wound up with some pieces longer than others. It might not sound like a big deal, but the slight variability in lengths made mitering the ends much more difficult.

Using a circular saw, we cut one end of all 24 (4 foot) lattice caps at a 45 degree angle. Then we placed the lattice cap on the lattice. We aligned the bottom of the cut edge to the corner of the lattice and marked the other end for the final 45 degree angle cut. We repeated this for all 24 caps. If all of your lattice pieces are exactly the same size, you should only have to make the measurement once. Then cut everything to match.

Clamp then Drill
Once you have all your mitered joints cut, assemble the caps on a lattice square then clamp them in place. Using a power drill and the ½” #4 screws, drill a hole through the lattice cap and lattice and screw the two pieces together. We used 2 screws at each corner, but it wouldn’t hurt to put in a few extra.
Assemble & Touch-Up
Now that you have all 6 square panels completed you’re ready to assemble your fence. Lean 2 panels side by side against a vertical wall. Join them together using at least 2 zip ties (one near the top and one near the bottom). Pull them as tight as you can while the pieces are in the fully-open position. You should still be able to fold and flex the two panels. Continue joining the remaining pieces together in this same manner.


And if you don’t like the look of the zip ties, you can always use metal hinges instead. Check out this DIY Pet Gate article that shows how to make a smaller pet gate using hinges.
Put a dab of liquid white-out on the screw tops to make them less visible. If you’re looking for added stability but you don’t want to permanently mount the gate to your wall, try using a few strips of Velcro. We have one end of our cat gate wedged in place between a wall and a piece of furniture and the other end is Velcroed to the wall so we can easily get in and out.